EZ Loader Quick Start Guide
Quick Start Guide
This article is intended to be a reference for those familiar with and have prior experience with a TMS software.
This article covers the bare essentials to get operating within EZ Loader
- Setting your digital Signature + Uploading Company Documents
- Navigating the User Interface
- Carrier Profile Requirements
- Customer Requirements
- Building a Load
Please Note: Additional detailed information can be found within our Knowledge Base and Video Hub
Setting your Digital Signature + Uploading Company Documents
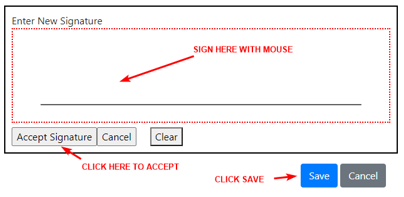
To send rate confirmations, carrier onboarding, or anything else in EZ Loader TMS you must first set up your Digital Signature. This can be found in your profile under the settings section
Click your initials in the top right corner > Settings > Profile

Click the Edit Button on the "User Signature Section"
The "Company Documents" section allows you to view and change the documents that are utilized throughout EZ Loader TMS:
Click your initials at the top right > Settings > Settings and Documents
1. Simply pick which document you would like to update, and click the "browse" button.
2. To view the currently uploaded document, click the link below the upload box.

Click Here for Full Article on Company Documents
Navigating the User Interface

Command Center - The main Input Area of EZ Loader TMS. This is how you add anything into the system
- New Load - Opens New Load Wizard so you can build a load.
- New Prospect - Opens the form to build a new prospect.
- New Customer - Opens the form to build new Customer.
- New Carrier - Opens the form to build new Carrier.
- New Task - allows you to add a task and attach it to a reference.
- New Note - Allows you to add any type of note and attach it to a profile or load.
- New Phone Note - Log a call and attach it to a prospect, customer or carrier.
- New Quote - Opens the form to build a new quote.
Carrier Profile Requirements
In Summary, when Insurance information is entered, a Carrier Agreement document type has been uploaded (Carriers complete this during digital Carrier Onboarding, or it can be manually added to the documents section of the carrier profile), and the Carrier profile is in Active status, the Carrier can be added to a Load.
Step 1: Enter Insurance Information
Go to the Carrier Profile > Details > Insurance & Certifications > Click Edit

Step 2: Confirm a "Carrier Agreement" document type has been uploaded into the documents section of the carrier profile.
Step 3: Change the status of the Carrier profile to " Active".
Go to Details > Carrier Info > Status > choose Active
Click Here for Full Article on Carrier Requirements
Customer Requirements
There are only 2 requirements to build a load for a customer:
1.Customer Profile must have status of "Customer"
Customer Profile > Details > Settings > Edit > Status "Customer"
2. Customer must have a Credit Limit set
Customer Profile > Accounting > Credit and Terms
We suggest a few more items to set up when adding a new Customer and making them active (See full Article Link Below):
- Set up Assigned & Default Sales Reps
- Set up billing information and requirements
Click Here for Full Article on Customer Requirements
Building A Load
Step 1: Click Command Center > New Load
Step 2: Select Customer, Enter Load Details and Customer Rate
Step 3: Enter Origin, Destination, and Item Details
Step 4: Assign Carrier, Enter Carrier Rate, Send Carrier Rate Confirmation
Please note: When Assigning a carrier in the new load wizard the carrier name will show in a number of different color options:
- Red = Unacceptable Risk Rating or No Insurance / Expired Insurance
- Yellow = Moderate Risk Assessment, Carrier Flagged, or Missing Requirements in Carrier Profile (Click Here for Requirements to Assign Carrier to Load)
- Green = Available and Good to Go
Click Here for Full Article on Building a Load
Removing Loads / Customers / Carriers
In EZ Loader TMS, there is no method to fully "Delete" or Remove records from the system.
To effectively "Delete" or "Remove" a Customer / Carrier / Load, you must move the applicable record into a certain Status that essentially Voids the record from any further functionality and excludes from displaying within Reports.
After the Customer / Carrier / Load has been moved to the applicable Status, you will need to filter your search criteria to exclude the particular Status so that any search results will not display the "Voided / Inactive" Customer / Carrier / Load.
"Voided / Deleted" Statuses:
- Customer = Inactive
- Carrier = Inactive
- Load = Voided
Excluding a Status from Search Results:
In any of the Advanced Search menus (i.e. Customer, Carrier, Load Search), select the drop down box in the "Status" field and uncheck the box next to the statuses mentioned as seen above.
